When we talk about top antivirus that users rely on, then Avast is one among them. Since its inception in the year 1995, Avast is providing a top notch level of security not only to its premium users but also the one who are using the free version of the antivirus.
Now, although Avast is one of the
safest antiviruses that protect your PC from all kinds of malicious infections and threats, it is possible that sometimes it flags a genuine program or website as a threat and blocks it. This is known as false positive.
Moreover it is a known fact in the antivirus market that no security products available in the market can have 100% detection rates and none of them are false positive proof. Now and then every antivirus is found guilty of detecting a safe file or program as an infection and removes it. And this when we require to temporarily disable an antivirus so that we can add that genuine file to the exclusion list.
So if Avast is also falsely detecting a genuine program or website as a threat and blocking it, then you can temporarily disable your Avast antivirus by the steps that we discussed in the article.
How to Disable Avast Antivirus (Completely)
Avast Antivirus provides you with an option to entirely disable antivirus or its individual shields. We will learn how to disable individual shields of Avast in the later part of th
Anyway, now that’s out of the way, here’s how to disable Avast, completely.is article, but we start with how to turn off Avast completely.
Now, before starting, we would like to bring to your attention that disabling your
antivirus completely will put your PC or laptop at risk of harmful infections. Therefore, only do this if extremely necessary, and immediately turn on your antivirus once your task is completed.
So, here are the steps on how to disable Avast antivirus:
- Locate Avast antivirus in the task bar (bottom right corner) of your PC. Once, you find the Avast icon in the taskbar, right-click on the icon and from the menu that appears select the tab, Avast shield control.
- Once you click on the Avast shield control or hover the mouse arrow, it will open a new drop-down menu, with different time length to disable Avast antivirus.
- Next select the length of time for which you want to disable Avast protection for. The drop down will give you different time options that are as follows:
Disable for 10 minutes.
Disable for 1 hour.
Disable until computer is restarted.
Disable permanently.
- Out of the different available options, select the one that suits you best and click on it.
- Avast will immediately show a prompt on the screen whether to confirm your actions or cancel in case you have done it accidentally. The prompt will remain for 60 seconds on the screen and if you do not click in that time frame then the prompt will itself disappear.
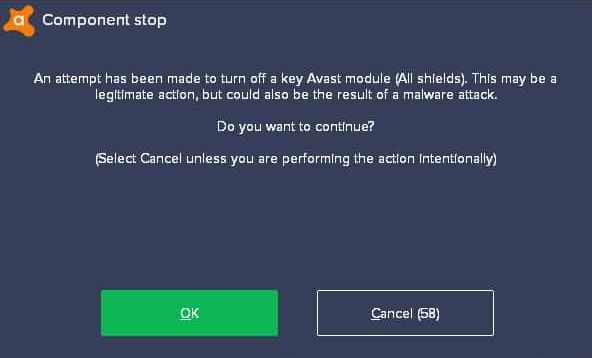
- Now, since we intentionally wish to disable Avast antivirus click on the OK button to proceed.
You can also check and make sure that you successfully turn off Avast by double clicking on the Avast icon located at the desktop of your computer. You will see a message on the main screen of Avast that all shields are disabled. You can also confirm from the taskbar, where you can see a cross next to the Avast icon. All this confirms that you have successfully disable Avast.
How to Temporarily Disable Avast Antivirus Individual Shields
Avast is a powerful antivirus program that provides you an all round protection to your computer with its different inbuilt shields, that are File Shield, Behaviour Shield, Web Shield and Mail Shield. Therefore, it is not always necessary to completely turn off Avast, on the contrary you can disable individual shields by following the steps we are going to discuss below:
Moreover, turning off an individual shield will not put your entire PC on the risk, and the risk will be minimal when compared to completely disabling it.
- Open Avast antivirus software interface on your computer by either double clicking on its icon located on the desktop or right-clicking on its icon in the task bar and selecting Open Avast user interface option from the menu.
- Now, once you are in the User Interface click on the Protection tab, located on the left panel of the program window. This will open multiple options on the right side of the program window.
- From the available options click on the Core Shields tab to select it.
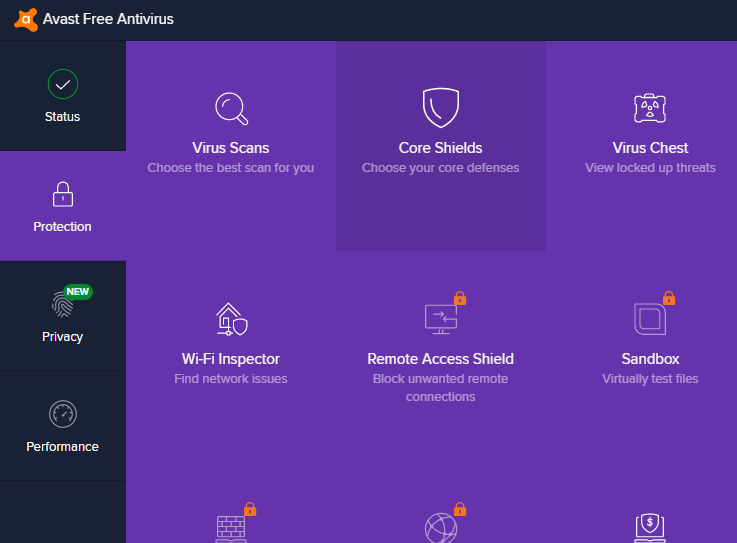
- Now, inside the Core Shields you will find all your shields (File, Behavior, Web and Mail) as active.
- Each Shield option has a toggle ON/OFF switch that can be used to enable or disable the shield.

- Next select the shield that you want to disable and turn the toggle to off position. As soon as you turn the toggle to off, a prompt will appear asking your confirmation along with how long you wish to disable it for. Select the option as per your choice and on the final confirmation box click on the button that reads, OK, STOP.
- This will disable that individual shield for the time that you have chosen.
You can confirm the same by clicking on the Avast icon on the taskbar, where you can see a cross(X) next to the icon or on the main interface of the program.
Note: Once your work is completed do not forget to enable all the shields (by pressing the toggle to ON position) that you have deactivated previously.
Wrapping Up
So, folks this is all from our side. We hope that you are now able to disable your Avast antivirus without any problem. However, we strongly recommend you to only turn off Avast when it is extremely necessary, and enable it as soon as the task is completed.
Read Also :
Top 10 Tips for Choosing a Right Washing Machine


